The Long Rail Report
Foundation Rebuilder
Hi Sam,
Your Long Rail Report is ready. Take your time with it — there's a lot in here. Read it once for the big picture, then come back to specific sections as you work through the 8-week plan.
Your Long Rail Report is ready. Take your time with it — there's a lot in here. Read it once for the big picture, then come back to specific sections as you work through the 8-week plan.
YOUR FULL REPORT — THE FOUNDATION REBUILDER
Your game is at the stage where the foundation needs attention before anything else will hold. That is not an insult. It is the fastest route: fix what everything sits on and the rest starts improving on its own.
|
Where you are
39%
|
Level
DEVELOPING
|
WORK ON FIRST
Technique Foundation
|
🎯1. What kind of player you are
What you're good at
You took a hard look at your own game, which most players avoid for years. And you have no bad-habit empire to defend: what you build now gets built right the first time.
What's holding you back
Stance, bridge, and stroke need the work first. Chasing spin, power, or advanced position play before those hold is why past improvement has not stuck.
📊2. Where you're strong, where you're weak
Technique Foundation
38%
Stance, bridge, grip, alignment — the physical foundation that everything else is built on.
Cue Delivery
38%
Stroke straightness, follow-through, timing, pre-shot routine — how cleanly you deliver the cue to the ball.
Ball Control
38%
Stop, follow, draw, position play, speed control — what happens to the cue ball after contact.
Game Intelligence
40%
Safety, shot selection, break, kicks, mental game — the strategic and psychological side of cue sports.
🚨3. Everything that's costing you frames
We found 9 issues in your game. That's a lot — and it's normal at your level. Don't try to fix all of them. The 8-week plan in Section 5 sequences them in order, starting with the highest-impact one. Read the full list once, then forget the rest exist until the plan tells you to come back.
Technique Foundation — 38%
#1: Stance instability
HOW BAD: 5/5
⚠️ What it's costing you:
An unstable stance moves your bridge and cue line during the shot, costing potting accuracy and consistency. Every other technical element is built on top of stance — instability here multiplies through your whole game.
An unstable stance moves your bridge and cue line during the shot, costing potting accuracy and consistency. Every other technical element is built on top of stance — instability here multiplies through your whole game.
✅ Where to start
Run the static stance test: 30-shot session where you exaggerate keeping your back foot, hips, and shoulders completely still through every shot. Film one shot from behind, watch for any movement. Throughout every shot — smooth stroke, no grip pressing, full follow-through.
Try this drill: Static Stance Drill — 30 straight pots, no body movement permitted
#2: Inconsistent bridge hand
HOW BAD: 5/5
⚠️ What it's costing you:
Bridge hand is the only point of contact between your stroke and the table. Inconsistency here means every shot has a different launching pad — making consistent results impossible regardless of how well you stroke.
Bridge hand is the only point of contact between your stroke and the table. Inconsistency here means every shot has a different launching pad — making consistent results impossible regardless of how well you stroke.
✅ Where to start
Pick ONE bridge type for open shots (closed or V-bridge) and use it for the next 100 shots. Force consistency before refinement.
Try this drill: Five Bridges Drill — practise all five required bridges in rotation
#3: Pre-shot routine varies by shot difficulty
HOW BAD: 5/5
⚠️ What it's costing you:
If your routine differs between easy and hard shots, you're training your nervous system to associate hard shots with a different physical state — which is exactly what creates pressure misses.
If your routine differs between easy and hard shots, you're training your nervous system to associate hard shots with a different physical state — which is exactly what creates pressure misses.
✅ Where to start
Same pre-shot routine every shot, no exceptions. Even on shots you could pot blindfolded. The routine is the foundation, not the situation.
Try this drill: Identical Pre-Shot Routine Drill — 20 mixed difficulty shots, identical setup sequence
#4: Tense / inconsistent grip
HOW BAD: 4/5
⚠️ What it's costing you:
Tight grip stops the cue from following its natural line. The cue can't "swing" if the hand is locked — every shot becomes a steered, pushed motion instead of a delivered stroke.
Tight grip stops the cue from following its natural line. The cue can't "swing" if the hand is locked — every shot becomes a steered, pushed motion instead of a delivered stroke.
✅ Where to start
Hold the cue with just enough pressure to lift it. On the back stroke, your fingers should almost open. Practise this on the lag pace shot, 20 reps.
Try this drill: Light Grip Lag Drill — 20 cue ball lags at minimum pace with relaxed grip
Cue Delivery — 38%
#5: Misdiagnosing miss patterns
HOW BAD: 5/5
⚠️ What it's costing you:
If you can't diagnose why you miss, you can't fix it. You'll keep "trying harder to aim" when the actual issue is your stroke not delivering on the line.
If you can't diagnose why you miss, you can't fix it. You'll keep "trying harder to aim" when the actual issue is your stroke not delivering on the line.
✅ Where to start
Miss-cause checklist: every miss, identify out loud — was it aim, was it stroke (cue not straight), was it speed, or was it spin (off-centre contact)? Even being wrong forces the diagnostic muscle.
Try this drill: Miss Diagnosis Log — 1 week, every miss categorised
#6: Pre-shot routine inadequate
HOW BAD: 5/5
⚠️ What it's costing you:
Without a defined pre-shot routine, you make different shots different ways. Your good shots can't be replicated and your bad shots can't be explained — both are random outcomes.
Without a defined pre-shot routine, you make different shots different ways. Your good shots can't be replicated and your bad shots can't be explained — both are random outcomes.
✅ Where to start
Write your pre-shot routine down in 5-7 steps. Tape it to your case. Use it on every shot for one week minimum.
Try this drill: Written Pre-Shot Routine Drill — physical card, every shot, one full week
Ball Control — 38%
#7: No defined cue ball speed scale
HOW BAD: 4/5
⚠️ What it's costing you:
Without a known speed scale, every position shot is a guess. You'll consistently run too far or short and your position play will plateau because you have no calibration system to improve.
Without a known speed scale, every position shot is a guess. You'll consistently run too far or short and your position play will plateau because you have no calibration system to improve.
✅ Where to start
Define 5 named paces: lag (just reaches opposite cushion), soft, medium, firm, break-pace. Drill cue ball travel distance at each on a known shot. Calibrate every new table during warm-up.
Try this drill: Five-Pace Calibration Drill — known shot at each defined pace
Game Intelligence — 40%
#8: 70% rule misunderstood
HOW BAD: 4/5
⚠️ What it's costing you:
The 70% rule isn't "always take 70% pots" — it's a context-aware decision. Misapplying it costs frames in two directions: bottling potable balls, or attacking unreasonable shots.
The 70% rule isn't "always take 70% pots" — it's a context-aware decision. Misapplying it costs frames in two directions: bottling potable balls, or attacking unreasonable shots.
✅ Where to start
Apply with context: (1) what's my pot percentage UNDER MATCH PRESSURE, not in practice, (2) what's my safety quality if I miss, (3) what's my opponent's return chance from that safety. Decide on the combination.
Try this drill: 70% Rule Decision Log — 1 week of frame-ball decisions, recorded reasoning
#9: Snooker decision-making weak
HOW BAD: 3/5
⚠️ What it's costing you:
When snookered, picking the wrong shot costs the frame. Without a decision framework, you'll either gamble on low-percentage pots or play random kicks that sell out.
When snookered, picking the wrong shot costs the frame. Without a decision framework, you'll either gamble on low-percentage pots or play random kicks that sell out.
✅ Where to start
Best/worst outcome framework: for every snooker, identify the best realistic outcome of each option, the worst, and pick the option with the largest gap (max upside / min downside).
Try this drill: Snooker Decision Drill — 10 set positions, verbalise best/worst before each
📅4. Your practice vs. your goal
You said your goal is professional standard.
To get there, most players need around 20 hours of practice a week.
Right now, you practise 2 hours a week.
Right now, you practise 2 hours a week.
That is a real gap. But at your level, hours are not the first problem. The players who improve fastest at your score close the quality gap first: structured sessions with a measurable focus. The plan below is built for exactly that. Add hours once the fundamentals hold.
How you practise
Structure: Your practice is unstructured. Frames and random hitting maintain your level; they do not raise it. The plan below gives every session a job.
Fundamentals recency: You have not done a basics-only session in over six months. That is where the plan starts.
Measurement: You are not measuring your practice. Every drill in the plan has a score for exactly this reason: what gets measured gets fixed.
🗓️5. Your 8-week plan
Week 1 — Lock down your stance
🚨 Addresses: Stance instability
Focus: Stay completely still through every shot. No moving your body. None.
Time/week: 3-4 hours
30 stance shots, then 10 line-test reps.
Time/week: 3-4 hours
30 stance shots, then 10 line-test reps.
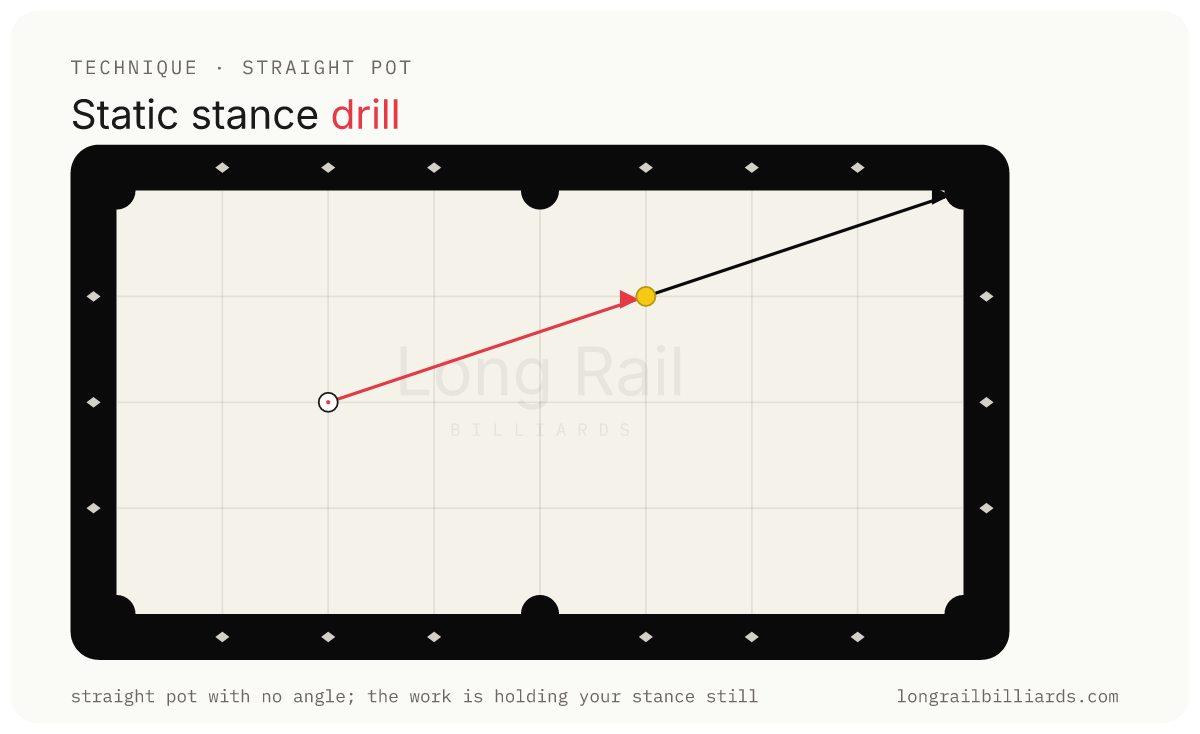
📌 Static Stance Drill
SETUP: Cue ball on the spot. Object ball halfway between cue ball and the corner pocket. Straight pot, no angle.
HOW: Get into your stance. Take 3 practice strokes, then deliver. AFTER contact, hold your stance for 2 full seconds — do not stand up. Eyes stay on the cue ball line. Smooth stroke, no grip pressing, full follow-through.
GOAL: 30 shots in a row. Any shot where your body, head, or back foot moves before the 2-second hold ends counts as a miss. Target: 28+ out of 30.
HOW: Get into your stance. Take 3 practice strokes, then deliver. AFTER contact, hold your stance for 2 full seconds — do not stand up. Eyes stay on the cue ball line. Smooth stroke, no grip pressing, full follow-through.
GOAL: 30 shots in a row. Any shot where your body, head, or back foot moves before the 2-second hold ends counts as a miss. Target: 28+ out of 30.
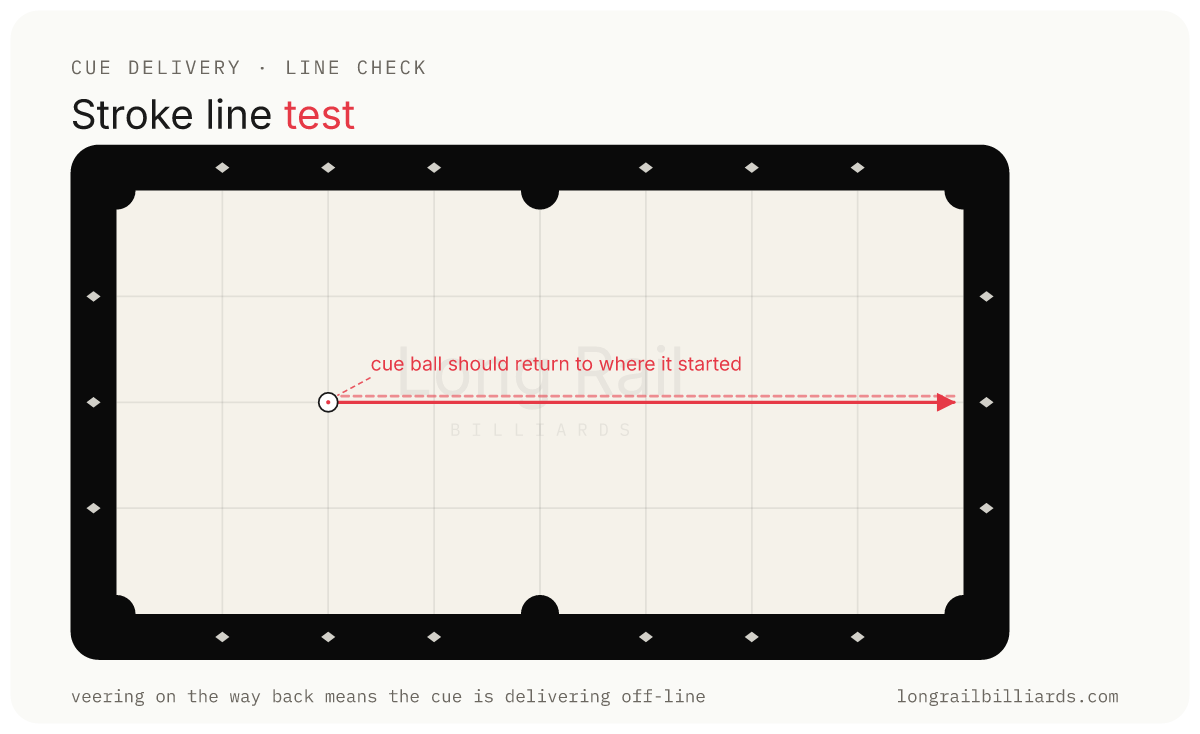
📌 Stroke Line Test
SETUP: Cue ball on the spot. Target the centre of the far cushion straight down the table. No object ball.
HOW: Set up as if for a long pot down the centre. Strike the cue ball with centre contact, medium pace. The cue ball travels to the far cushion and returns. CHECK: where does the cue ball cross your starting position on the way back?
GOAL: 10 reps. Target: 7+ should return within 1 inch of where they started. Consistent veering means your cue is delivering off-line.
HOW: Set up as if for a long pot down the centre. Strike the cue ball with centre contact, medium pace. The cue ball travels to the far cushion and returns. CHECK: where does the cue ball cross your starting position on the way back?
GOAL: 10 reps. Target: 7+ should return within 1 inch of where they started. Consistent veering means your cue is delivering off-line.
Week 2 — Get your bridge right
🚨 Addresses: Inconsistent bridge hand
Focus: Pick one bridge type and get it perfect. Then add the other four.
Time/week: 3-4 hours
10 minutes of bridge work daily.
Time/week: 3-4 hours
10 minutes of bridge work daily.
📌 Bridge Anatomy Drill
SETUP: Place the cue on a flat table surface (no balls). Position your bridge hand on the table.
HOW: Form your bridge. Slide the cue back and forward 5 times along the V — the cue must track through the centre every time. Lift your hand off. Re-form from scratch. Repeat the 5-stroke check.
GOAL: 10 minutes daily. The bridge should form identically every time without you thinking about it.
HOW: Form your bridge. Slide the cue back and forward 5 times along the V — the cue must track through the centre every time. Lift your hand off. Re-form from scratch. Repeat the 5-stroke check.
GOAL: 10 minutes daily. The bridge should form identically every time without you thinking about it.
📌 Five Bridges Drill
SETUP: No specific layout — practise switching bridges on different shot positions.
HOW: Open bridge: standard V, cue ball mid-table. Closed bridge: index finger looped over cue. Rail bridge: cue ball close to cushion. Over-ball bridge: cue ball behind another ball. Elevated bridge: cue ball frozen to a ball.
GOAL: 5 shots with each bridge, 25 total. Each bridge must be set up correctly before stroke begins.
HOW: Open bridge: standard V, cue ball mid-table. Closed bridge: index finger looped over cue. Rail bridge: cue ball close to cushion. Over-ball bridge: cue ball behind another ball. Elevated bridge: cue ball frozen to a ball.
GOAL: 5 shots with each bridge, 25 total. Each bridge must be set up correctly before stroke begins.
Week 3 — Loosen your grip
🚨 Addresses: Tense / inconsistent grip
Focus: Hold the cue light. Let it swing freely. The cue does the work.
Time/week: 4 hours
20 lag reps to feel the grip release.
Time/week: 4 hours
20 lag reps to feel the grip release.
📌 Light Grip Lag Drill
SETUP: Cue ball on the baulk line / head string. No object ball.
HOW: Hold the cue with minimum pressure — you should be able to wiggle your fingers during the back stroke. Take 2 practice strokes. Deliver smoothly, no acceleration. Cue ball travels to the far cushion and just barely returns past the centre of the table.
GOAL: 20 lags. Target: 15+ should stop within 1 ball-width of the centre after returning.
HOW: Hold the cue with minimum pressure — you should be able to wiggle your fingers during the back stroke. Take 2 practice strokes. Deliver smoothly, no acceleration. Cue ball travels to the far cushion and just barely returns past the centre of the table.
GOAL: 20 lags. Target: 15+ should stop within 1 ball-width of the centre after returning.
📌 Setup Sequence Drill
SETUP: Any standard pot.
HOW: Standing up: identify the line of aim. OUT LOUD say: "Feet on the line." Then: "Bridge on the line." Then: "Chin on the cue." Then take practice strokes and deliver.
GOAL: 20 shots. Target: 20/20 with the verbal sequence completed every time.
HOW: Standing up: identify the line of aim. OUT LOUD say: "Feet on the line." Then: "Bridge on the line." Then: "Chin on the cue." Then take practice strokes and deliver.
GOAL: 20 shots. Target: 20/20 with the verbal sequence completed every time.
Week 4 — Test how straight you cue
Focus: Measure how straight your cue actually goes. No guessing.
Time/week: 4 hours
15 line-test reps this week, filmed.
Time/week: 4 hours
15 line-test reps this week, filmed.
📌 Stroke Line Test
SETUP: Cue ball on the spot. Target the centre of the far cushion straight down the table. No object ball.
HOW: Set up as if for a long pot down the centre. Strike the cue ball with centre contact, medium pace. The cue ball travels to the far cushion and returns. CHECK: where does the cue ball cross your starting position on the way back?
GOAL: 10 reps. Target: 7+ should return within 1 inch of where they started. Consistent veering means your cue is delivering off-line.
HOW: Set up as if for a long pot down the centre. Strike the cue ball with centre contact, medium pace. The cue ball travels to the far cushion and returns. CHECK: where does the cue ball cross your starting position on the way back?
GOAL: 10 reps. Target: 7+ should return within 1 inch of where they started. Consistent veering means your cue is delivering off-line.
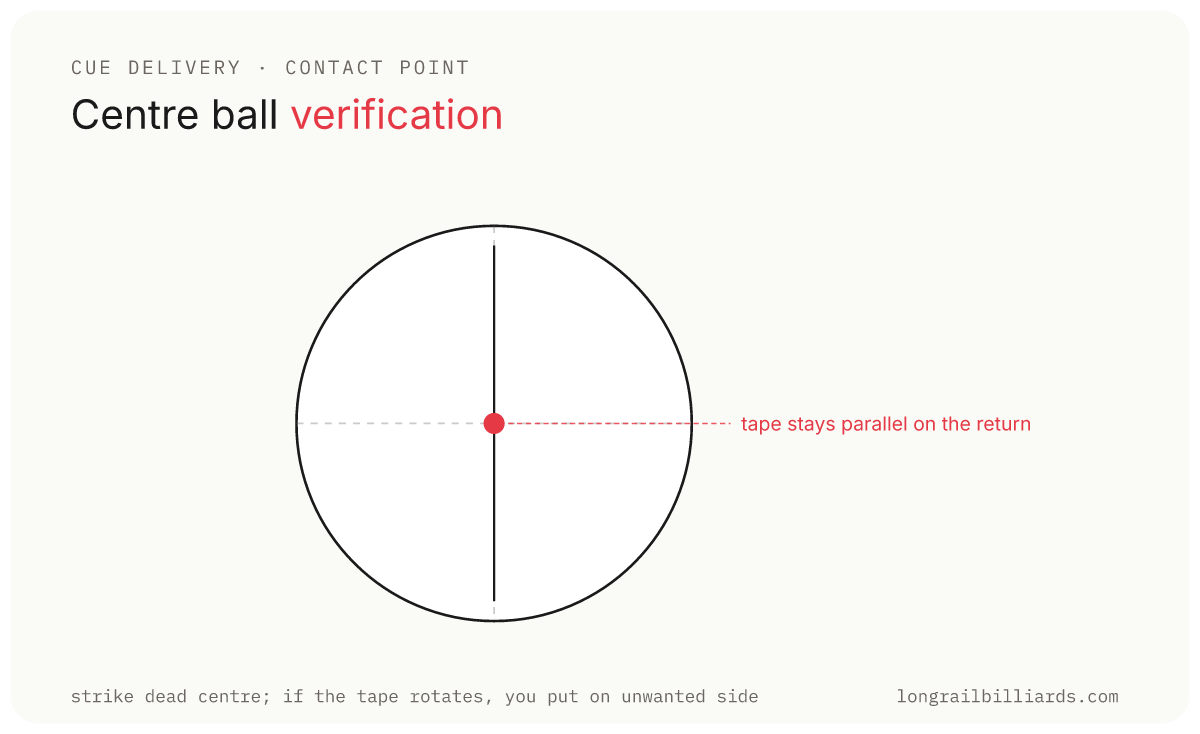
📌 Centre Ball Verification
SETUP: Place a thin strip of masking tape down the centre of the cue ball, lined up with your aim line. Cue ball on spot.
HOW: Strike the cue ball straight to the far cushion and back. Watch the tape as the cue ball returns. If the tape stays parallel to your aim line, you struck centre. If it rotates, you applied unintentional side.
GOAL: 10 reps. Target: 8+ where tape stays parallel.
HOW: Strike the cue ball straight to the far cushion and back. Watch the tape as the cue ball returns. If the tape stays parallel to your aim line, you struck centre. If it rotates, you applied unintentional side.
GOAL: 10 reps. Target: 8+ where tape stays parallel.
Week 5 — Master the stop shot
Focus: Build cue ball control, starting with the simplest shot.
Time/week: 4-5 hours
Time/week: 4-5 hours
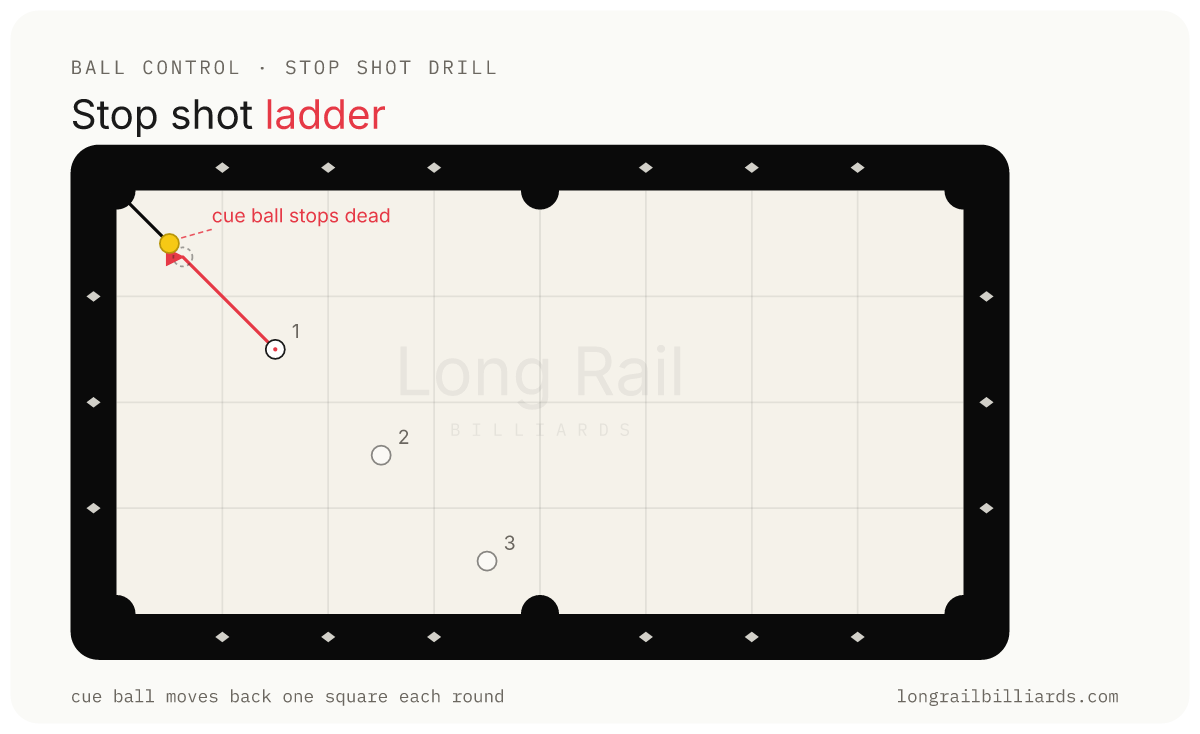
📌 Stop Shot Ladder
SETUP: Cue ball and object ball lined up straight to a corner pocket. Start at 12 inches between them.
HOW: Pot the object ball, cue ball must stop dead. Hit slightly below centre, medium pace. After 5 successful stops at 12 inches, move to 18 inches. Then 24, 36, 48. Same goal at every distance: cue ball stops dead.
GOAL: 5 stops at each of 5 distances = 25 shots. Target: 4/5 dead stops at every distance up to 36 inches.
HOW: Pot the object ball, cue ball must stop dead. Hit slightly below centre, medium pace. After 5 successful stops at 12 inches, move to 18 inches. Then 24, 36, 48. Same goal at every distance: cue ball stops dead.
GOAL: 5 stops at each of 5 distances = 25 shots. Target: 4/5 dead stops at every distance up to 36 inches.
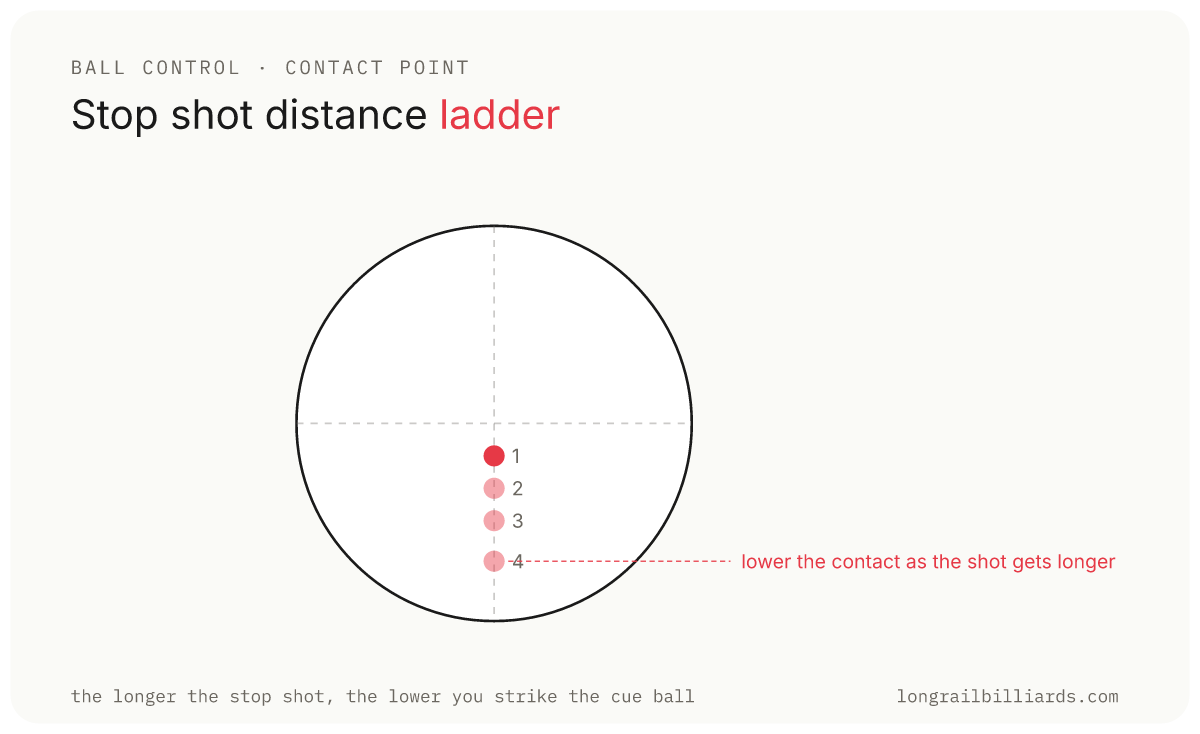
📌 Stop Shot Distance Ladder
SETUP: Same as Stop Shot Ladder, but at each distance you adjust contact height.
HOW: At 12 inches: just below centre. At 24 inches: lower (cue ball has more time to pick up roll). At 36: lower still. At 48: clearly low contact. Match the height to the distance.
GOAL: 5 stops at each distance. Target: 4/5 at all distances. Write down which contact height works for each distance.
HOW: At 12 inches: just below centre. At 24 inches: lower (cue ball has more time to pick up roll). At 36: lower still. At 48: clearly low contact. Match the height to the distance.
GOAL: 5 stops at each distance. Target: 4/5 at all distances. Write down which contact height works for each distance.
Week 6 — Follow shot and draw shot
Focus: Add forward roll and backward draw to your control.
Time/week: 4-5 hours
Time/week: 4-5 hours
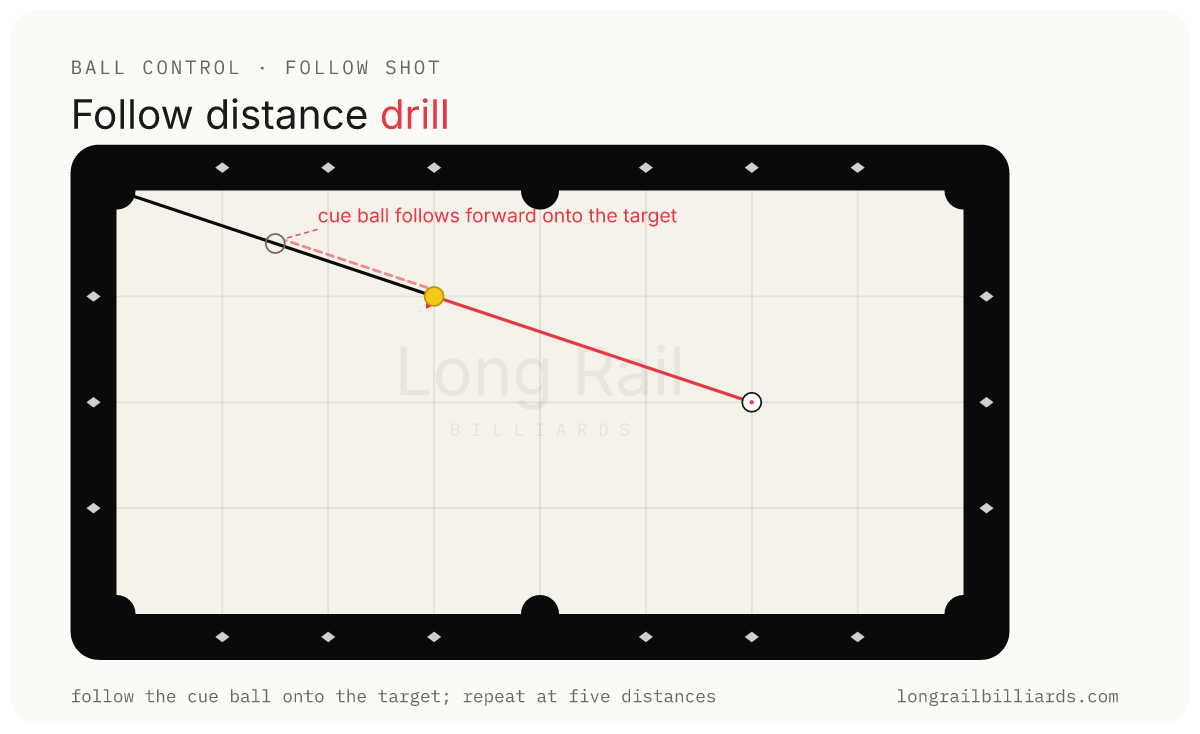
📌 Follow Distance Drill
SETUP: Object ball in front of a corner pocket. Cue ball 24 inches behind it. Mark 5 target spots up-table at varying distances.
HOW: Pot the object ball with follow. Cue ball must end up at the marked target spot. Strike above centre, smooth follow-through.
GOAL: 5 distances × 5 reps each = 25 shots. Target: cue ball within 6 inches of target spot 4/5 times.
HOW: Pot the object ball with follow. Cue ball must end up at the marked target spot. Strike above centre, smooth follow-through.
GOAL: 5 distances × 5 reps each = 25 shots. Target: cue ball within 6 inches of target spot 4/5 times.
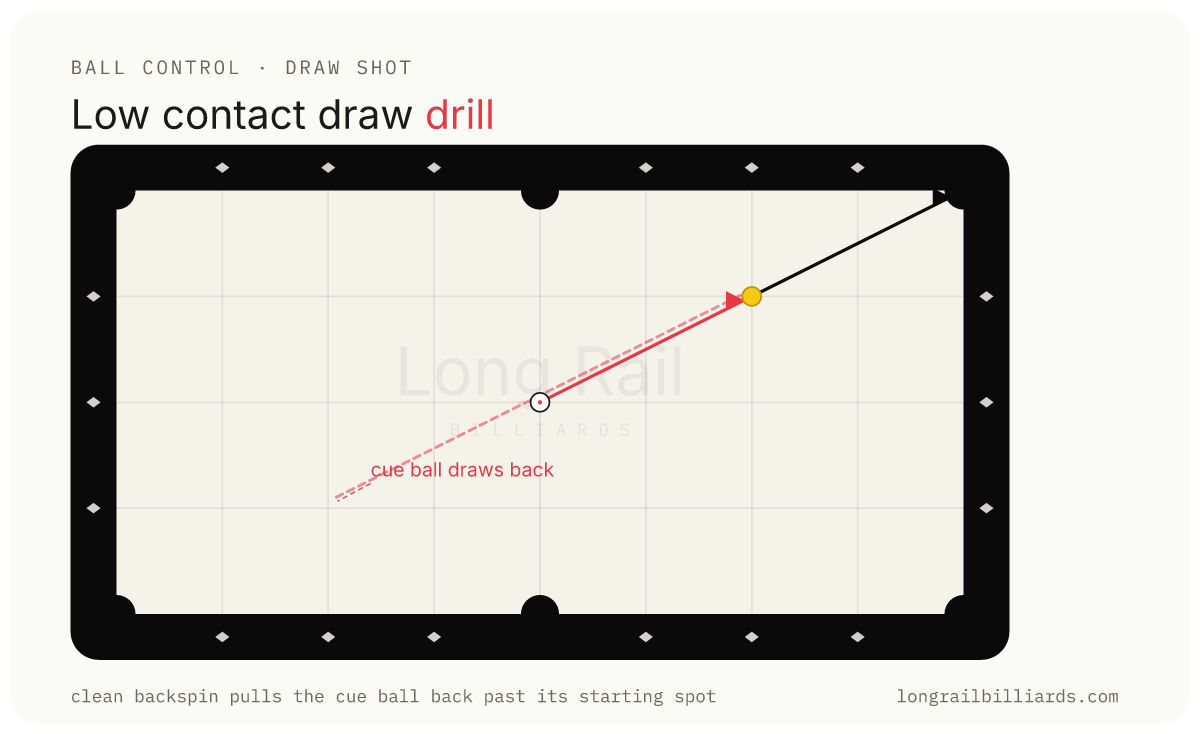
📌 Low Contact Draw Drill
SETUP: Object ball 24 inches from cue ball, lined up to a corner pocket.
HOW: Strike clearly below centre. Cue must be level (no elevation). Smooth, accelerating stroke through the ball. Follow through 6+ inches past where the cue ball was. Cue ball should draw back at least 18 inches.
GOAL: 30 shots. Target: 20+ clean draws (cue ball pulls back at least 18 inches).
HOW: Strike clearly below centre. Cue must be level (no elevation). Smooth, accelerating stroke through the ball. Follow through 6+ inches past where the cue ball was. Cue ball should draw back at least 18 inches.
GOAL: 30 shots. Target: 20+ clean draws (cue ball pulls back at least 18 inches).
Week 7 — Learn the stun shot
Focus: The most useful position shot in the game. Practise it until it feels normal.
Time/week: 4-5 hours
20 stun reps at each of 3 distances.
Time/week: 4-5 hours
20 stun reps at each of 3 distances.
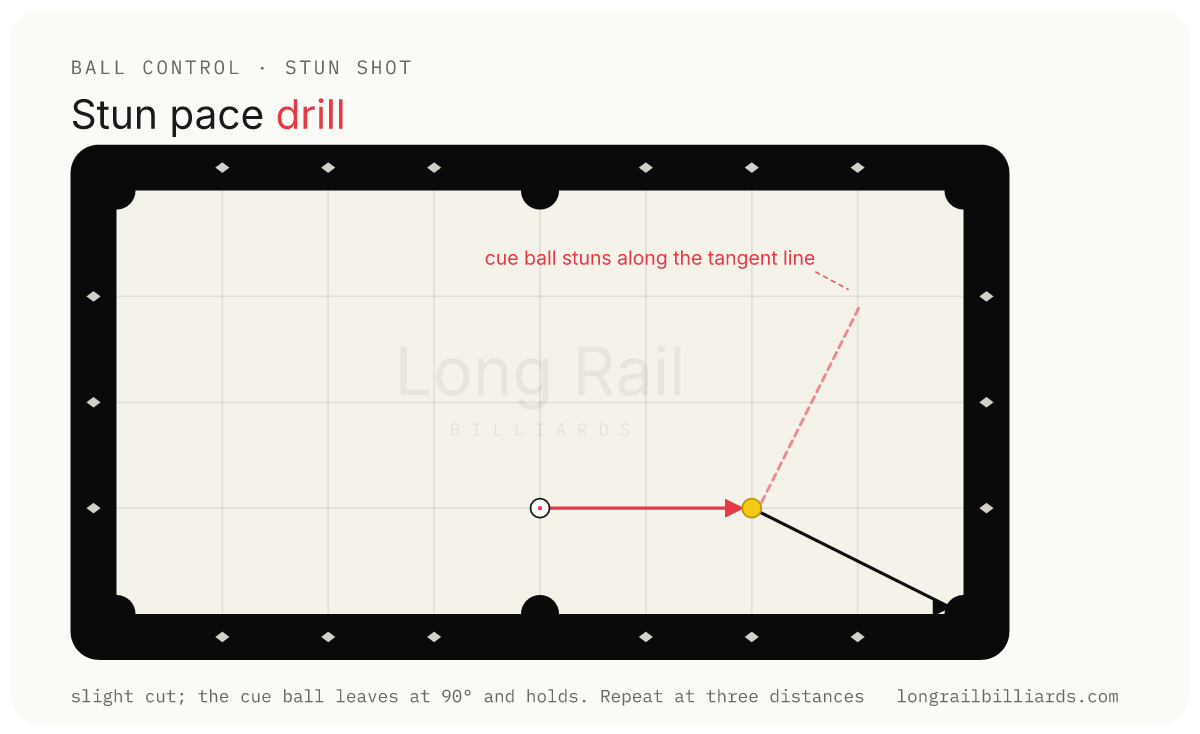
📌 Stun Pace Drill
SETUP: Object ball at three distances: 24, 36, 48 inches from cue ball. Slight cut angle.
HOW: Strike just below centre. Match pace to distance — pace must be tuned so the cue ball is still sliding when it contacts the object ball. Watch the cue ball: stun = minimal angle off the cushion, no run-on.
GOAL: 20 shots across the 3 distances. Target: 15+ where the cue ball clearly stuns and holds position.
HOW: Strike just below centre. Match pace to distance — pace must be tuned so the cue ball is still sliding when it contacts the object ball. Watch the cue ball: stun = minimal angle off the cushion, no run-on.
GOAL: 20 shots across the 3 distances. Target: 15+ where the cue ball clearly stuns and holds position.
Week 8 — Put it all together
Focus: Bring everything from the last 7 weeks into actual matches.
Time/week: 5 hours + match play
Play full frames under match conditions: best of 5, score kept, no slop. Compare how you play now against week 1. Then retake the assessment — same link as before — and see what moved.
Time/week: 5 hours + match play
Play full frames under match conditions: best of 5, score kept, no slop. Compare how you play now against week 1. Then retake the assessment — same link as before — and see what moved.
📈6. What to track each session
These are the four numbers that tell you if your work is paying off. Write them in a notebook every session.
One bad session means nothing. What matters is the trend over 2-3 weeks — are the numbers moving up?
| What to track | Goal | How often |
|---|---|---|
| Stroke Line Test — cue ball returns on line | 8 out of 10 | Every session |
| Stance stays still through every shot | 30 out of 30 shots | Weekly |
| Bridge looks identical every time (filmed) | Identical setup | Every 2 weeks |
| Pre-shot routine done on every shot | Every shot, no exceptions | Every session |
🎯7. Your first 30 days
Week 1 — Where you are now
This week, find out exactly where you stand. Run the first drill from your Week 1 plan. Score yourself honestly. Don't try to fix anything yet — just measure. Take a photo of your scores so you can compare in 30 days.
Week 2 — Pick ONE thing
Pick ONE drill from your top issue. Just one. Do it every day for 7 days. Don't add anything else. Doing one thing properly beats doing five things badly.
Week 3 — Add one more
Keep doing the Week 2 drill. Now add the second drill from your top issue list. You now have two specific things to work on every day.
Week 4 — Take it into matches
Bring everything from the last 3 weeks into real matches. The first 2-3 frames will feel uncomfortable as you try new things under pressure. That's the point — that discomfort means the new pattern is starting to stick.
💬8. Diagnostic summary
Most players never do what you just did: look at their own game honestly. The temptation now is to fix five things at once. Do not. Pick one thing, give it two weeks of honest reps, then move to the next. Improvement at this stage compounds fast, but only in that order. The plan below is the order.
Ready for the next session?
Take the check-up again in 30 days to see how much you've improved.
This report is yours to keep. Print it. Save it. Re-read it before every session this week.
Questions? Reply to this email.
Questions? Reply to this email.